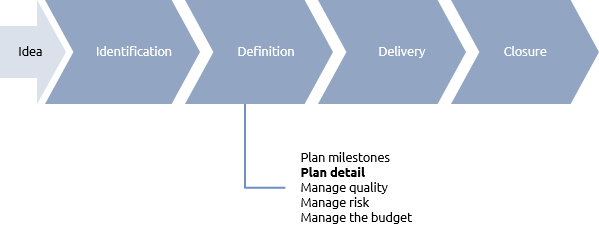
Where are we?
You’ve had your project brief approved, and maybe you’ve identified your milestones. However, what you want to do now is to start planning the project in some detail. Just how much detail is an interesting question, and one that we must answer right at the start.
What is a plan for?
A plan is a very useful document (or package of documents) for the project manager. Your plan should tell you:
- That the project is possible.
- What has got to be done, in what sequence.
- Who will be involved, either doing the activities or signing things off.
- When things will be happening.
- When things will be complete.
- How the budget will be spent.
- How and when you will be addressing quality, risk and stakeholder management issues.
So, from this list you can decide what documents you require, based upon the complexity of the project. Complexity can be defined in several ways, as follows:
Size | Meaning | Project management activities |
|---|---|---|
Simple |
|
|
Slightly more complex |
|
|
Common to all |
|
|
We will go through the steps required to produce a schedule in Gantt chart format. You must decide if your own project is ‘large’ enough to need all these steps, or if you can be safe with a quicker, lighter approach.
The six steps to produce a project schedule.
In essence these are the steps to produce a schedule for a simple project:
- Identify the activities
- Establish the ideal sequence
- Estimate the size (and maybe cost)
- Assign resources (maybe not, if you are the only resource!)
- Draw the schedule (maybe a Gantt chart, maybe an activity list)
- Optimise the schedule (make it fit reality)
Identify the activities
This activity list should be as complete as possible, and should include all project delivery activities and project management activities (planning, measuring progress, reporting, holding meetings and so on). You will have the project brief to start with, but it may be worth asking some of your colleagues to get involved in this process.
This is one of the first project management activities we have encountered that fall into the category of being ‘the sole responsibility of the project manager, but not a solo job’. This means that if you can get a few other ‘brains’ involved in the process you will get a much better result.
Ask your colleagues, but also consider asking your boss, your sponsor, someone who has no idea about the project (and who is not distracted by the assumptions you have made), suppliers (internal and external), specialists, potential resources, and so on.
Yes, this will make the process longer, but the result will be much better. You may have to listen to a lot of what seems like irrelevant piffle, but deep in the middle of it may be the killer facts that will make a difference to your success.
A good practical way of actually creating this activity list will involve using Post-it notes, those universal yellow stickies, and a wall. The technique of drawing a work breakdown structure (or WBS for short) is excellent for identifying as complete an activity list as you are likely to get. You can involve specialists, who can focus on their own area of expertise and the diagram, as it emerges, enables you to see the whole project in one place (as long as you have a big enough wall!).
Start by placing one Post-it at the top of the board or wall. This Post-it represents the entire project. Beneath that place Post-its that break the project down into its major components of scope. Take each component in turn, and break it down further. Keep on going, until for each activity at the lowest level you feel confident that you:
- Understand the activity and how to carry it out
- Can assign resources to it
- Can estimate the duration and cost
This means that for some areas of the project you may not need to go very far, whilst for others (maybe those areas which you feel unsure about) you may go further into the breakdown.
The next diagram shows the first draft WBS for the Lake project (it needs more work). Note that a WBS takes no account of sequence – this will come later.
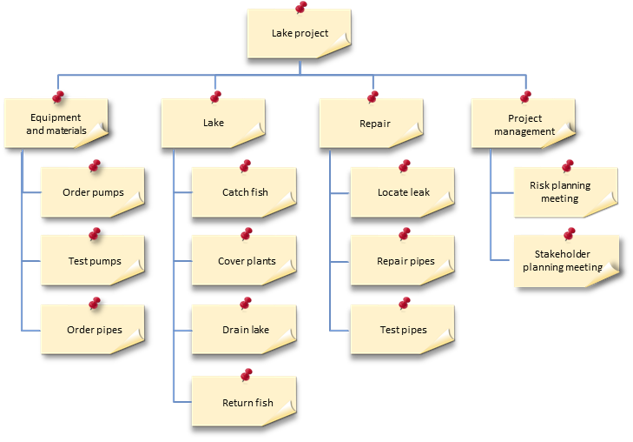
You might feel that you wouldn’t break the Lake project down in this manner, but would use some other breakdown. That’s OK, there is no single right way to create a WBS. If it is right for you, it is right. The power of a WBS lies in its ability to make sure you have a complete understanding of all the work required to deliver the project end product. It is a type of structured brainstorm. The diagram it produces is simply a step along the way towards our project schedule.
Establish the ideal sequence
If the project is small, local or low-risk you may be able to start the planning process at this step, missing out WBS, otherwise you must now sort the WBS Post-it notes into sequence.
So arrange all the activities into the ideal sequence, with the minimum of risk (it may be necessary to take risks later, by overlapping activities etc., but at this stage you should go for the ideal sequence). This technique produces what is called a precedence diagram, an example of which can be seen below.
By convention (and good sense) it is usual to have just one clear start and one end to a network. Not all activities can be fixed into this logical sequence, as some of them may relate to specific calendar events (such as a steering committee meeting that can only happen on a certain date). For these activities put them to one side – they can be inserted into the correct time position on the schedule later. No account is taken of timings or resource availability at this stage (it is easier to identify resource considerations once this sequencing has been sorted out).
The precedence network shows all the activities and their ideal sequence of dependencies. Again you could use Post-it Notes and a wall. Once you are happy with the sequence it is a good idea to draw in the linking lines between activities (but be careful that you don’t damage he wall behind the Post-its). The linking lines will show problems such as dangles (activities with no successors) and jumpers (activities with no predecessors – they just seem to jump into life). You should have no dangles and no jumpers at all.
Estimate the size of each activity
By ‘size’, we mean the length of time it will take (the duration), the resources needed to do it (the effort) and the cost. There are many practical ways of estimating the size of an activity, including:
-
Use records from previous projects. If you are lucky enough to have this information it can be useful, but must be treated with caution - are the conditions of your project the same as those previous projects?
-
Try some of the work, and measure it. This may be invaluable for activities that are completely unfamiliar to you, and which may be time critical
-
Ask the person who will carry out the activity, but be careful with the answer you get. Some people are naturally optimistic and set themselves impossible targets, others will give you the answer they think you want to hear, others are naturally pessimistic, others may be adding on some extra padding for their own comfort.
-
Ask an expert. This may cost money, but may be worth it (think of this as a type of risk management)
-
Ask the contractor. Again, be careful with the answer. He may be trying to win the job (and so the estimate may be light), or maybe he doesn’t want the job (so the answer is heavy).
-
Ask your colleagues. They may have experience of this work
-
Use a formula. Sometimes work can be reduced to a series of mathematical formulae. For example, if it takes 2 hours to paint three square metres, how many hours will be needed to paint 30 square metres?
-
Read the manual. There may be some documentation that will give an indication of likely effort to carry out a standard activity (very common in construction and engineering projects)
-
Just guess. Nothing wrong with this if you realise that it is a guess, based upon some reasonable assumptions. Make sure you write the assumptions down (not to cover yourself, but to remind you to check them out once the project gets under way).
Let’s look at one dangerous problem with all of this estimating. It seems like good practice to go to the person who will be carrying out the activity and ask them “How long will this take?” But what question we have just asked! There are two possible interpretations:
-
You may have asked – “Given a clear run at this activity, with no interruptions, how many hours (or days) would you need to complete it?’
-
Or you may have asked – “How long will it take you to do this activity?’
The differences can be startling. A very busy person, to whom you hope to delegate an activity on your project, may answer “2 days”. Just what does that mean?:
-
Does it mean “Two days clear effort, but it will take me a week to fit it in”; or
-
“I can do it in two days”
To be perfectly clear to your resource you may have to deliberately ask both questions, and try to establish both dimensions of the activity in one go. The two dimensions, of course, are ‘effort’ and ‘duration’.
Assign resources to activities
Now consider the resources. You might not be able to identify actual named individuals, in which case you may have to plan for resource types (e.g. 3 Java Programmers, 2 Painters).
It is probably OK at this stage to assume that the resources you need will be available when you need them and to make adjustments later on when the schedule is produced.
There are two reasons for assigning named resources to activities. The obvious one is so that you know who is going to carry out the activity, but the second reason is to know how long the activity will actually take (the duration). We might decide that a trainee, for example, will take longer to accomplish a 3-day activity than an expert would.
While effort and duration can be quite different, effort is closely associated with cost. The more effort an activity needs the more it will cost.
Duration is specified in a days, weeks or months. The duration of any particular activity will depend on a variety of factors, such as:
- How many people will be assigned to the activity.
- How much time each resource can devote to the activity.
The relationship between ‘effort’ and ‘duration’ is usually not a simple mathematical one. Each activity must be considered on its own merits, to know if assigning more resources will reduce the duration or simply raise the cost.
The standard management trick of throwing more people at an activity in the forlorn hope that it will speed up the work does not usually work, especially if there is a degree of intellectual content in the activity. Here are a few examples from the Lake project to illustrate the problem:
-
Catching the fish: if the fish catchers do not get in each other’s way then maybe adding more people should have a corresponding shortening effect on the duration, up to a practical limit.
-
A project kick-off meeting with all the team on site, on Friday lunchtime; it might just be that if more people go the meeting will take more, not less time!
-
A Press Conference in London; actually the travelling time to London will be the governing factor in this type of activity. If 2 people go then it will take one day on the schedule (the duration will be 1 day); however, if 5 people go the duration is still one day, but the costs will have gone up dramatically.
Take the time to consider how much time each person will be able to give to your project. You may be using resources that have a full-time day job which they must maintain during your project. So, face up to reality, if someone says that they can only give you 5 hours per week it is better to discover that now during the planning, rather than later, during the execution.
By now you will know all the activities, their relationships to each other, the resources assigned, the activity durations, and, where appropriate, the effort and cost required for each one. You are now ready to draw the schedule.
Draw the schedule
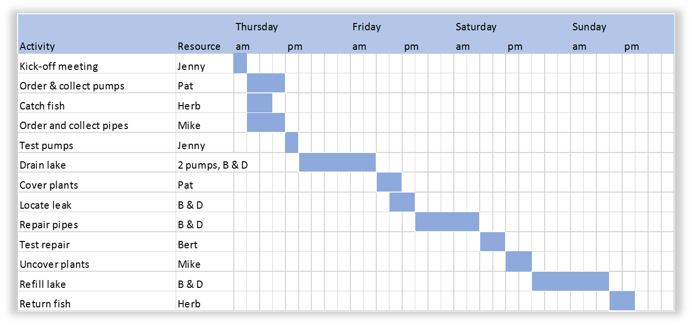
There are two main approaches to drawing the schedule, as discussed earlier. For a small, local, low-risk project an activity list might be perfectly adequate, and the table below shows an activity list based upon the milestone plan.
You can see how the list satisfies all the requirements of a ‘project schedule’ and it can be hand-drawn or created using a word processor or spreadsheet.

For a more complex project, or one with particular communication needs, you may decide that you need the sophistication of a Gantt chart.
Drawing a Gantt chart is relatively simple. By now you have all the information you need; all you have to do is to decide on the timescale and time units for the scale along the top. You have no choice where to put most of the activities, as the first one will start at the beginning; it is as long as it is long, and the next activity will start immediately after it, unless you wish to introduce a gap.
The figure below shows the Gantt chart for the Lake project produced in Excel. If you have used scheduling software to create a precedence network, it will produce the Gantt chart for you automatically.
Optimise the schedule
These are the six steps you undertake to produce your project plan. Only the sixth now remains to be done:
- Identify the activities
- Establish the ideal sequence
- Estimate the size
- Assign resources
- Draw the schedule (maybe an activity list, maybe a Gantt chart)
- Optimise the schedule (make the plan fit reality)
You have to carry out the first 5 steps in order to produce the schedule, but it is not until step 5 that you will be able to see if your plan actually works. So far you will have drawn the plan based upon the ideal circumstances but now you may have to fine tune it to fit real circumstances.
It may be that some of your resources are overloaded (they are allocated to two activities at the same time) or the project is not completed on time.
What you can do now is:
-
Challenge the basis of the estimates to confirm that the estimates are reasonable.
-
Review the activity sequence: take more risk by overlapping activities which would normally be done one after the other.
-
Look at the resources: assign more if necessary to shorten an activity; assign different resources based on availability; allow some activities to stretch.
-
Finally look at the activity list itself: leave out some work, either forever or until a later phase. You may not have the authority to do this; consult the sponsor to identify low-priority deliverables that the sponsor can afford to do without.
If this still does not solve the problems with your schedule you will have to go back to the sponsor with some suggestions for reducing the agreed scope of the project or the end date. In all these cases without the project schedule you will not be able to justify your analysis and suggestions.
Contingency
It may be worth thinking about building in some contingency (sometimes called ‘buffers’) to allow for unexpected events. As you will see in the chapter on managing the risks you can deal with unexpected events by building in specific extra activities aimed at reducing particular risks. However, there may be an opportunity right now to add in some extra time to allow for activity overruns.
What you mustn’t do is just add in a lump of extra time at the end of the project. This will draw attention to your lack of confidence in the project, and will be taken out with as little thought as you put into it in the first place.
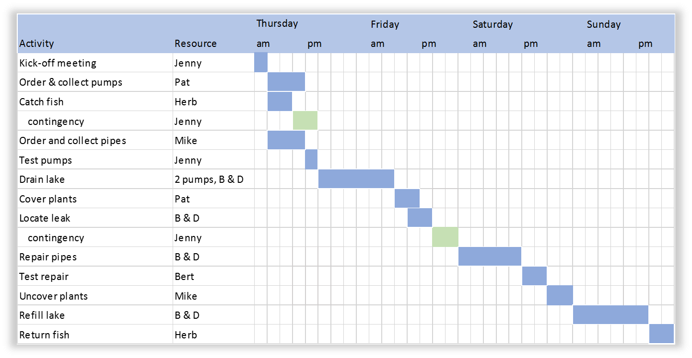
The figure below shows the Lake project Gantt chart, with two contingency entries.
Note the following:
-
Not many activities will need this type of contingency
-
The contingency is always assigned to the project manager, not the resource on the associated activity (otherwise the resource will see the extra time allowance, and use it up).
-
In some cases the contingency may cause subsequent activities to be delayed (see ‘locate leak’)
-
If activities take longer than planned the resource must report to the project manager for help. You can then release some of your contingency to the offending activity. In this way you can monitor the consumption of the contingency allowance.
-
You should always maintain a contingency list, which details your thinking behind each allocation of contingency. At the very least this list will be useful when explaining to the sponsor why the project might take longer than originally thought.
Summary
Without a schedule you will never be able to manage the project. You will be at the mercy of anyone who outranks you in the organisation. You will never be sure that the project will finish at all, let alone on time. Without a schedule you have to worry about every activity all the time; with a plan you will know which activities are urgent for today, and which are scheduled for next week.
Planning takes time, but if you try to match the overheads with the size of the project you will gain all the benefits of planning without slowing your project down.
Checklist
Decide on the type of schedule you need | An activity list or a full Gantt chart |
Plan your planning approach | Can you get someone to help you in the planning? |
Identify the activities | The complete list of all the activities you think you need; maybe create a work breakdown structure |
Sequence | The ideal sequence (you may have to overlap some activities later); maybe create a precedence network diagram |
Estimate the size of each activity | Activity effort is measured in ‘person hours’, or ‘person days’, and is a good indication of cost |
Assign resources | Maybe not, if you are the only resource! Once you know the resources available you can estimate the duration for each activity, measured in days or weeks of elapsed time. |
Draw the schedule | Maybe a Gantt chart, maybe an activity list |
Optimise the schedule | Make the schedule fit reality, by allowing for all the various constraints that will be imposed upon your project |
Further reading
These links to the Praxis web site explain how the concepts introduced in this chapter can be applied to projects that involve more people and more complex relationships.
The Praxis approach to defining complexity, which guides managers towards an understanding of the effort and techniques needed to manage the work. | |
An overview of both management planning and delivery planning for more complex projects and programmes. | |
An overview and procedure for developing time schedules for more complex projects and programmes. | |
A Praxis encyclopaedia entry explaining how to perform critical path analysis. | |
A Praxis encyclopaedia entry explaining how to reduce the time needed to complete a sequence of activities. | |
A Praxis encyclopaedia entry explaining how to optimise resource usage in a schedule. |
Thanks to Mike Watson of Obsideo for providing this book


